MongoDB M101P Windows 8.1 64bit Installation

This document walks you through installing the tools and libraries needed for the MongoDB M101P course available through university.mongodb.com

Installing MongoDB

Go to www.mongodb.org/downloads
image
Click on the huge green button to download MongoDB in a MSI file.
(The current version is 3.0.1)
”Unblock” the downloaded MSI by, right clicking on the file and choosing properties.  Then hit the unblock button.   Then hit Apply, then OK. If you don’t have this that’s okay.  Continue on.

image

Run the downloaded MSI file – you’ll likely have to approve installation 
I prefer to choose to do a custom install to C:\mongodb
After you have finished installing, you should now have C:\mongodb
With a subfolder C:\mongodb\bin
Create a folder C:\data
Create a subfolder C:\data\db

Installing Python

Go to the Python download page: www.python.org/download
clip_image002
clip_image003
Choose the Python 2.7.9 X86-64 installer.  Download and install it.  Let it go with the default path of C:\Python27
As of this publication date, the course content is not compatible with Python 3.x.  So, don’t get it!

Setting your path

If you want to be able to easily run the Python and MongoDB binaries from the command line you need to set your system path.
clip_image004
Choose System
clip_image005
Choose Advanced System Settings.  Then choose Environment Variables button.
clip_image006
clip_image007
Select the System Variables path as shown above.  Then click edit.  Append this to your system path:
;C:\Python27;C:\Python27\Scripts;C:\mongodb\bin; 
Don’t miss the leading and trailing semi-colons. 

Installing PIP

Go to http://www.pip-installer.org/en/latest/installing.html
Download get-pip.py I did this by, right clicking on the link and choosing, save link as
Next, open a cmd prompt.  You can do this with  <windows> + <r>  then typing cmd <enter>

Change to the directory where you downloaded get-pip.py, most likely C:\users\yourName\Downloads, and run it:
python get-pip.py
clip_image008

Installing pymongo

Visit https://pypi.python.org/pypi/pymongo/#downloads
clip_image009
Download and run the win-amd64 EXE and run it.  The current version is pymongo-2.7.2 (pymongo-2.7.2.win-amd64-py2.7.exe).  The installer will be blue background with white text and will have a title similar to the following:
clip_image010
After installation, run pip list to see that pymongo is installed (should be the new version).
clip_image011

Installing bottle

Use pip to install bottle.  Note that we have to use a special option to specify the version of bottle that we want installed.
pip install bottle==0.11.6
clip_image012

Project folder

Create yourself a project folder such as C:\Projects\m101p

I recommend that you create a subfolder for every weeks course files.  So, for the first week you would have C:\Projects\m101p\week1

Do not put course files in either the mongodb or python27 installation folders.

Starting MongoDB

I also suggest that you see this gist: https://gist.github.com/k0emt/10342867 as a way to start up a development mongod instance.

Stopping MongoDB

Use the mongo shell to properly shutdown mongod. Issue the following commands:

use admin

db.serverShutdown()

image

Subsequent to issuing the commands you will see some error messages.   This is normal as the shell just lost connection with the server.  You can now use <ctrl> + <d> or type the word exit to quit the shell.

The costs of poor usability

Today, I am going to share with you a little story about the costs of poor usability.  Imagine if you will, that you are going to do the annual renewal for your website.  It looks like there might be some alternate lower cost, better feature options available from the vendor now.  However, you can't see them because you aren't allowed to "change plan" when you have a balance due.

The screw up

Here's where it gets interesting.  So, you think, well I'll just "cancel" this pending charge over here on the billing page.  Okay, some generic message about deleting a file or other.  Not super clear.  Okay, click go.  (You're not too worried because there is a different cancel site feature on the website control panel.)  Now you try and go back to your website control panel and look at the other plans.  Well, it keeps having some sort of unspecified error.  Then your domain email disappears.  Oh noes!  The cancel button on the billing page, actually blew away your entire domain!

The recovery

So, I was able to get in touch with technical support via an 800 number.  Not too bad a hold time since it was the middle of the night.  He worked with me and we got the website back up.  Good thing I had a full local instance of it, because they didn't have anything.  They had immediately deleted the full site, logs and backups!  I had to go through and manually recreate email accounts.  But then I had to wait for users to "activate" their accounts before I could restore their email from the vendors back ups.  This entailed about two hours of hold time the following day with less than 30 minutes additional time needed to talk with a tech to finish restoring the email.

The costs

All told, the cost to me ended up being about 2 hours and 15 minutes of hold time and I'm thinking less than 90 minutes of tech time.  (I'll try not to dwell on the being on hold for 30 minutes and then having the call dropped.) As a side impact of this was a lost day of productivity.

The vendor took the hit of paying for an 800 number line for almost 4 hours!  Then there was the hit for the tech time of about 2 hours.  That's a lot of money.

Domain users panicked.  Will I ever get all of those hundreds of emails back?  Will that important email I've been waiting for come in while we're down?  They had to spend some time activating their account and waiting for their email box to be restored.

Conclusion

Poor usability costs everyone.  Imagine if there had been a very clear warning along the lines of "hey, this operation will DESTROY YOUR ENTIRE DOMAIN!"  Then followed up with a confirmation email or text?  (I mean we do that for subscribing to an email list.  So, it seems like that would be a legit thing to do for canceling an entire domain.)  I think a lot of lost time, spent money and pain could have been avoided with better usability.

Important Information for KCDC MongoDB Workshop

TL;DR

The single most important thing you need to know is that if you show up with a machine that is running Windows XP or a machine that doesn't have a JDK on it, you're gonna have a bad day.

Prerequisites for your computer

OS: Windows 7 or 8, preferably 64bit, Linux or recent OS X
Have a Java SDK 1.7 installed and configured with IDE on machine

Why? Because we will utilize features that were introduced in MongoDB version 2.2.

Windows XP and older versions of Linux/OS X ARE NOT SUPPORTED by MongoDB 2.2+

Prerequisites for you

Review and be familiar with JavaScript Object Notation at http://json.org
Be able to run and use the command prompt / terminal of your OS.
Be able to create code, add a jar/library, compile and run code in your favorite IDE.

Primary Goal

It is my primary goal that you leave the workshop with a functioning MongoDB environment and knowledge of the fundamentals with the skills to do routine development work.

Course Outline


  • Introduction and Installation of MongoDB
  • Schema (Relational and Document Oriented)
  • Creating, Reading, Updating and Deleting documents (CRUD)
  • Advanced CRUD - sub documents, arrays, sorting, limiting and other operators
  • backups
  • Performance/Indexes
  • Aggregation Framework
  • GridFS
  • Replication
  • Sharding Overview
  • Open Lab - Time Permitting

MongoDB Schema

One of the major aspects of MongoDB is that it is a document store.  You can put anything you want into a document-- it is schema-less.  However, in many cases the documents stored in a collection do consist of the same fields.  So, in answer to the question, "how do I determine the schema of a collection?"  There are a couple options.
  1. Manually/visually inspect the contents of the collection
  2. Use a utility to examine a single document
  3. Use some sort of utility to examine all of the documents in a collection

Manually inspecting the collection

As you can imagine is simply, "using" the database, and doing a db.collectionName.findOne()
For thoroughness, you'd probably want to examine more than one document.  This is where a db.collectionName.find().pretty() will come in handy.

Use a utility to examine a single document

I created a small python utility given a database name and collection name will give you the keys for a document in the collection.  This requires you have Python 2.7 and pymongo installed on your computer.  I put this in my ~/bin directory and chmod +x it.

Use a utility to examine all of the documents in a collection

Skratch. has a cool extension to the MongoShell which examines all of the documents in a collection and tells you how many documents are using the field.  Fields can vary in type by document.  So, this tool even breaks down the occurrence of the field by type!  It is on github at: https://github.com/skratchdot/mongodb-schema/

MongoDB examples, Replica Set and GridFS

MongoDB Replica Set with Python example

I published a short lab on working with MongoDB replica sets in Python on GitHub https://github.com/k0emt/mongodb_repset_experiment

One thing to note is that I included all of the replica set nodes in the connection information.  That is because if "regular" primary node was down at the time of initial connection the code would fail.

The nodes in the replica set will figure out who should be primary and that will happen auto-magically behind the scenes.  However, your client code still needs to deal with needing to reconnect.

Adjust the counters if you want to have the client up and running longer while you experiment.

MongoDB GridFS with Java example

Example code for demonstrating GridFS and the metadata field with Java was also published on GitHub  https://github.com/k0emt/gridfs_example_java

By utilizing the metadata field you can keep your document metadata with it.


Tasks, Notes and Contact Sync

So, I finally broke down and got a MacBook Pro with OS X Mountain Lion.  My personal machines to date have been Windows, Android and LINUX machines.  Because I have a myriad of platforms I have been using Google as the intermediary when it comes to sync.  Here are some notes/observations from my experience in trying to get syncing set up for tasks, notes and contacts.

Tasks

Simply put, there is no good sync for Tasks with OS X Mountain Lion.  All of the material I've found indicates that there is no way to sync Reminders with Google Tasks.  While the account set up says calendar and reminders it simply doesn't work for connecting to Google.  Just use Google Tasks via the web browser and the awesome Android gTasks application on your Android Slate/Convertible or phone.

Contacts

When I first set up the contacts sync I was only seeing 35 contacts.  I knew this wasn't correct.  After looking at the contacts section of GMail I figured out that it was only showing contacts that are tagged with "My Contacts".   After adding the "My Contacts" tag to all of my contacts they all started syncing.  However, you do lose all of your groups/tags in the contacts app on OSX.  They are not removed from GMail.

I also discovered that a new contact that had been entered on the mac wasn't syncing out to the Google contacts.  However, if I created the contact on Google contacts first it would sync out to the mac.

Notes

Notes syncs with GMail notes, not Google Docs (now Drive).  After setting up notes, I was experiencing super annoying pauses and loss of focus as the app would frequently sync with Google.  At that time I was only syncing with Google for notes.  When I turned on sync to iCloud in addition the pauses stopped.  Oh, and before you turn off syncing, make sure you have the notes associated with that account saved somewhere else.  Notes removes the notes you are no longer syncing!

After a couple days of using this set up, I made a horrifying discovery.  Every one of the syncs that was being done with Google (every few keystrokes) was creating an entirely new mail document.  I had dozens of emails which represented the progression of changes in the document!  Also, in digging into the configuration, I wasn't really syncing with iCloud for the notes either.  When I tried to turn this on through a different control panel it demands that you create an email account that will be associated with your iCloud account.  No thanks.  I am now not syncing notes either.

This article had some useful information on setting up notes sync.

Summary

I only ended up syncing Contacts when it was all said and done.  Unless you are willing to go with a single platform (Apple, Android or Microsoft) you will have sync gyrations to deal with.  Having a web based IMAP/calendar provider is a key component to making all the syncing work.

Keeping RIM Viable

It is no secret that RIM has lost its huge lead in the smart phone area.  Not only have they lost their lead, they are in danger of becoming irrelevant.  What can RIM do to not only be viable, but to become a leader again?  There are two things they can do: put Android on RIM devices and be the premier provider of sync for contacts and tasks.

Android on RIM devices

I’m sure that I’m not the first person to suggest switching from BB OS to Android.  Although, there are some details that I think are important to make this work:
  • Keep the high quality look and feel of the devices
  • Have Wi-Fi on the phone
  • Have the killer BlackBerry keyboard.
  • Have a large screen touch device with a slide out BlackBerry keyboard.
Android on the device doesn't mean having a tool or process that can be followed to port an Android app to the BBOS. It means having Android running natively on the device. For my the BlackBerry was never about the OS. The parts of the software I like are the unified settings area, the ability to change to a nice array of fonts and the security. But more important aspects were the quality feel of the device and the signature keyboard and trackball.

Sync for Contacts and Tasks

This is an area where RIM could really jump in and dominate.  With their experience with sync and BlackBerry devices and their experience with infrastructure in the secure messaging area they are uniquely positioned to be able to make this happen.  It is amazing that in present day there is still a need for a seamless way to sync contacts and tasks between devices.  What would it take for RIM to meet this need? 
Provide web applications for viewing and managing contacts and tasks.
Provide sync software for BBOS, iOS, Android, OutLook on Windows and mail/reminders on OS X.

Where have I been? (MSE ITS Project)

I wasn’t as prolific with my posts in 2011 and this year because I was focusing on finishing my Master Software Engineering degree and Intelligent Transportation System (ITS) project.  My project website with full documentation and source can be found here: http://people.cis.ksu.edu/~bnehl/

My MSE project takes a Multiagent System approach to the Control of Traffic Signals (MACTS). In additional to control of the local intersection there will be a configuration which incorporates near neighbor coordination. The system was designed with the intent of utilizing distributed cooperating agents. The system goals include minimizing the number of stops, reducing the amount of wait time, reducing travel time, increasing the average speed of travel, reducing fuel consumption and reducing the production of hydrocarbon emissions.

The project code interfaces with the Simulation for Urban MObility (SUMO) application.  MACTS was implemented with Python, RabbitMQ and MongoDB.

Git Reference

Git community book online: http://book.git-scm.com/index.html
creating:init, branch
adding and removing files::add, rm
seeing activity:log, status
basic repository operations are: push, pull, commit, checkout, clone, fetch, merge
undoing changes: reset, checkout, revert
see files in the repo:ls-files
finding stuff:grep
labeling:tag


Some git cheat sheets:
http://help.github.com/git-cheat-sheets/
http://cheat.errtheblog.com/s/git

How do I see the differences between file versions?
git diff <commit hash> <filename>

How do I go back a to version x?
Then to revert a specific file to that commit use the reset command:
git reset <commit hash> <filename>

You may need to use the --hard option if you have local modifications.
A good workflow for managaging waypoints is to use tags to cleanly mark points in your timeline. I can't quite understand your last sentence but what you may want is diverge a branch from a previous point in time. To do this, use the handy checkout command:

git checkout <commit hash>
git checkout -b <new branch name>


You can then rebase that against your mainline when you are ready to merge those changes:
git checkout <my branch>
git rebase master
git checkout master
git merge <my branch>


How do I find/look at a files history (log)?
git log <filename>
http://book.git-scm.com/3_reviewing_history_-_git_log.html

Using --stat with log will show what files changed and by how much.
git log --stat

There is also a --pretty option that provides several nicer ways of presenting the results
git log --pretty=oneline
git log --pretty=short
git log --pretty=format:'%h was %an, %ar, message: %s'


You can also use 'medium', 'full', 'fuller', 'email' or 'raw'. If those formats aren't exactly what you need, you can also create your own format with the '--pretty=format' option (see the git log docs for all the formatting options).

How do I roll back/throw away current changes?
Use checkout if you haven’t committed yet.
$ git checkout -- hello.rb
$ git checkout HEAD hello.rb

http://book.git-scm.com/4_undoing_in_git_-_reset,_checkout_and_revert.html

Use revert to fix committed mistakes.

You have to be careful when you say "rollback". If you used to have one version of a file in commit $A, and then later made two changes in two separate commits $B and $C (so what you are seeing is the third iteration of the file), and if you say "I want to roll back to the first one", do you really mean it?
If you want to get rid of the changes both the second and the third iteration, it is very simple:

$ git checkout $A file

and then you commit the result. The command asks "I want to check out the file from the state recorded by the commit $A".
On the other hand, what you meant is to get rid of the change the second iteration (i.e. commit $B) brought in, while keeping what commit $C did to the file, you would want to revert $B

$ git revert $B

Note that whoever created commit $B may not have been very disciplined and may have committed totally unrelated change in the same commit, and this revert may touch files other than file you see offending changes, so you may want to check the result carefully after doing so.

Disclaimer: I created the layout of this document, along with the questions I wanted answered for myself.  The answers are gleaned and lightly edited from results I found during the research process.  Quite a few answers were found on
stackoverflow.com

Python Coding Standard, Metrics and Test Coverage

Motivation

My motivation in seeking a coding standard, static code metrics analyzer and test coverage tool is multifaceted.  I want to know that my Python code is formatted in a way that is accepted by the community.  I want to be able to quickly check the cyclomatic complexity of code.  It is my intent to test drive my code.  Therefore, I wanted a tool which could show me and others the level of code coverage and any areas that need to be brought under test.

Note that the preferred download for all three of these tools is a .tar.gz format file.  On a Windows system you’ll need a tool like 7-zip.  All of this guidance is intended for use with Python 2.7 and PyCharm 1.5.4.  You need to add C:\Python27\ to your PATH environment variable in order to successfully install these tools.

PEP8

PEP8 is a tool that provides guidance that you are following proper Python coding formatting.  Download from here: http://pypi.python.org/pypi/pep8

Extract the PEP8 folder.  Using a command prompt change to the extracted PEP8 folder directory.  Run: python setup.py install There should now be a pep8.exe and pep8-script.py in your python installations scripts directory.  You can now delete the extracted PEP8 folder.

PEP8 with PyCharm

From http://www.in-nomine.org/2010/12/14/pycharm-and-external-lint-tools/

PyCharm already has a number of features present in various tools to lint/check your source code with, but offers a way to hook up external tools. Under File > Settings is a section called IDE Settings. One of the headings here is called External Tools. Select this heading and then press the Add... button on the right hand pane to configure a new external tool.

In the Edit Tool window that now appeared fill in a name, e.g. PEP8 and a group name Lint and add a description. Next point the Program to the location of the pep8.exe executable, e.g. C:\Python27\Scripts\pep8.exe. ForParameters you need to use $FilePath$ and Working directory should be same as the Python scripts directory. Once done, you can close it by pressing the OK button.

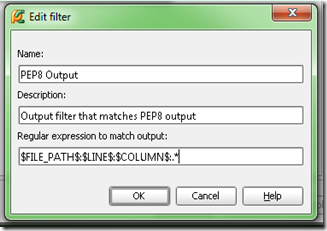
Now add a filter to the external tool to get click-and-go-to behavior

image

See http://www.jetbrains.com/pycharm/webhelp/add-filter-dialog.html for how to add filters.

use this for the spec: $FILE_PATH$:$LINE$:$COLUMN$:.*
image

Select a file either in the navigator or editor panes.

Then from menu can go to Tools > Lint > PEP8

You'll also have links you can click on for the PEP8 output.

Following my initial installation notes on a second machine I was getting a urllib.parse error from PEP8.exe, "no module named parse" Seemed like this problem is related to distribute. Pulled down the latest from http://pypi.python.org/pypi/distribute Nope, wouldn't install. Looking like issue with C:\python27\lib\urllib2.py.  Web pointed me to reinstall setuptools http://pypi.python.org/pypi/setuptools  Installed that… tried to install distribute again… still no go… X|  Ended up doing a python setup.py install to get distribute installed.  Now, PEP8 works!

PyMetrics

PyMetrics is a tool for doing static code analysis.  Download it here: https://github.com/ipmb/PyMetrics/downloads There is a tar.gz on SourceForge. However, the pymetrics runner does not have the .py extension which causes problems with extraction on a Windows System.

Extract your downloaded file.  Change to that directory and run python setup.py install  You can now delete the extracted folder.  Now if you look in your Python scripts directory you'll find a pymetrics.py

Set up as an external tool in PyCharm as with PEP8.

image

The --nosql and --nocsv options tell the tool to not generate associated SQL insert code and suppresses the generation of a related CSV file.

Sample output from DarkMatterLogger.py

An earlier version of the DarkMatterLogger.py that was analyzed can be found here: https://gist.github.com/1218497

C:\Python27\python.exe C:\Python27\Scripts\pymetrics C:\macts\source\spikes\DarkMatterLogger.py
=== File: C:\macts\source\spikes\DarkMatterLogger.py ===
Module C:\macts\source\spikes\DarkMatterLogger.py is missing a module doc string. Detected at line 1

Basic Metrics for module C:\macts\source\spikes\DarkMatterLogger.py
--------------------------------------------------------------
          4    maxBlockDepth
         12    numBlocks
       3726    numCharacters
          2    numClasses
         15    numComments
          5    numFunctions
         24    numKeywords
        104    numLines
        668    numTokens

         14.42 %Comments

Functions DocString present(+) or missing(-)
--------------------------------------------
- DarkMatterLogger.__init__
- DarkMatterLogger.sendMessage
- DarkMatterViewer.__init__
- DarkMatterViewer.__init__.msg_consumer
- main

Classes DocString present(+) or missing(-)
------------------------------------------

- DarkMatterLogger
- DarkMatterViewer

McCabe Complexity Metric for file C:\macts\source\spikes\DarkMatterLogger.py
--------------------------------------------------------------
          1    DarkMatterLogger.__init__
          1    DarkMatterLogger.sendMessage
          1    DarkMatterViewer.__init__
          2    DarkMatterViewer.__init__.msg_consumer
          1    __main__
          4    main

COCOMO 2's SLOC Metric for C:\macts\source\spikes\DarkMatterLogger.py
--------------------------------------------------------------
         55    C:\macts\source\spikes\DarkMatterLogger.py
*** Processed 1 module in run ***

Process finished with exit code 0

Coverage.py

Coverage.py is a tool for doing code coverage analysis.  Download it here: http://pypi.python.org/pypi/coverage  If you have a 64bit installation you’ll want to make sure you use the .tar.gz and not succumb to using a prepackaged exe.

Downloaded the coverage-3.5.1.tar.gz version.  Extract folder from gzipped tar file.  Chang to directory of download and: python setup.py install  Now if look in c:\python27\lib\site-packages will see coverage-3.5.1-py2.7.egg Look in the scripts dir and a coverage.exe and coverage-script.py will be seen.

Gather metrics on your code with: coverage run class.py

Then get the report with: coverage report -m

The -m says show the line #s of statements that were not executed.  Use coverage erase to get rid of previously run data.  During my experimenting every run would get rid of previous data. 

Set up as an external tool in PyCharm like other tools.  Except had to do one for the run and another for the report.  Others are integrating into their environment using nose.

Name: Coverage

For program: C:\Python27\Scripts\coverage.exe

For parameters: run $FileName$

Working directory: $FileDir$

Name: Coverage Report

For program: C:\Python27\Scripts\coverage.exe

For parameters: report -m

Working directory: $FileDir$

Coverage Sample Output

C:\Python27\Scripts\coverage.exe run C:\macts\source\spikes\ArgumentsTests.py
...........
----------------------------------------------------------------------
Ran 11 tests in 0.004s

OK

Process finished with exit code 0

Coverage Report Sample Output

C:\Python27\Scripts\coverage.exe report -m
Name             Stmts   Miss  Cover   Missing
----------------------------------------------
arguments           33      0   100%  
argumentstests      45      0   100%  
----------------------------------------------
TOTAL               78      0   100%  

Process finished with exit code 0

Summary

By integrating these three tools into your development process you’ll increase the community acceptance of the code you produce as well as increase the quality of the code you produce.

Getting the Enron mail database into MongoDB

Background

In order to get some experience working with Python and MongoDB I decided I would like to find a data source with a lot of free form text. This would give me experience in pulling the data into MongoDB and at a future date I’ll have a ready data source for use with learning NLTK.
Finding a large dataset that met my needs turned out to be harder than expected. I came across Hilary Mason’s link page of research-quality data sets (now a dead link, see my collection which includes as much of Hilary's as we could recover.) and found the Enron email dataset. This data set contains over 500K emails. The emails are in individual files stored in a directory structure. To me, the first step in being able to use the data is to get it into a database where I could query it.

The environment

The code was developed on an Intel Core-I7 machine with 6G of RAM and a 5400RPM hard disk. This code is I/O intensive and could have benefitted from a faster hard disk or an SSD. The host OS was Ubuntu 11.04 64bit. The tools used were Python 2.7 with pymongo and MongoDB.

The code


How to query

You can use the mongo shell to do some queries once you have loaded the data.
“use the enron_mail” database and you can do the following:
db.messages.find({ contents : /query text/i }).limit(1).skip(0);
Besides content, the document structure also includes: mailbox, subFolder and filename.
Here are some additional links with material on the shell and how to query:
http://www.mongodb.org/display/DOCS/Overview+-+The+MongoDB+Interactive+Shell http://www.mongodb.org/display/DOCS/Tutorial http://www.mongodb.org/display/DOCS/Querying http://www.mongodb.org/display/DOCS/Advanced+Queries

Analysis

Important things to note about the code:


  • change the MAIL_DIR_PATH variable to match your installation.

  • getFileContents decodes the text as being in cp1252 character set

  • saveToDatabase encodes the text in utf-8 for mongo compatibility

  • The os.walk method is key to the simplicity of this code


  • Here are some references on unicode:
    http://docs.python.org/howto/unicode.html http://stackoverflow.com/questions/4685568/importing-file-with-unknown-encoding-from-python-into-mongodb
    The full run took ~21 minutes after an initial run that probably had a bunch of files in cache. The run maxed out a single core of the CPU. The process was i/o bound with the hard drive. The full 6G of RAM was in use on the machine
    My query of MonogoDB says I have 517,424 emails in the document store. It shouldn’t be too difficult to modify the code to work with your database of choice.
    I hope you find this code useful and that it enables you to do some analysis with this dataset.

    Addendum

    Brendan McAdams @rit created a version of the code which utilizes the Python email library to produce a database with more metadata.  You can see the results of his work here: http://mongodb-enron-email.s3-website-us-east-1.amazonaws.com/ (now a dead link)

    Work when others are not

    I read an interesting blog post from the Time Management Ninja where he talks about getting things done at the office during the last week of the year.

    However, it wasn’t quite what I expected when I had seen the title (same as this blog post).  For me, working when others are not is typically about quiet time at home or on the road working on personal or academic pursuits.  To get this quiet time I typically “work when others are not” by getting up earlier than the rest of the house or staying up later.

    While you can stay up later to work on things, I have found that past a certain time it just doesn’t matter.  The mind fogs and the body starts forcing shutdown routines to run!

    The approach that requires more discipline but I find is ultimately the better choice is to go to bed earlier and get up earlier.  You awake refreshed, with clear head and a quiet house.  Here are some tips to help you get that time in the morning:

    • Figure out how many hours of sleep you need and how many hours you want for yourself before you have to leave for work or school in the morning.  Set your go to bed time accordingly.
    • Set an alarmed reminder for 30 minutes before your go to bed time.  Start your shutdown routine.
    • Use the alarm on your phone as your alarm clock and have it set to the minimum volume necessary.  Set it up to not beep through the night for email or social network alerts.
    • Shower the night before (but not at the last minute which wakes you back up)
    • Lay out your clothes the night before.  You may need to get dressed in the bathroom or other location so you don’t wake up others in the house.
    • Have your workspace ready to go.  Leave yourself a note of what you are going to work on.  Have a bottle of water and perhaps a light snack there too.
    • Pack your lunch the night before.
    • If you are going to check email or your favorite sites, set a timer so you don’t blow all your quiet time on that.

    I hope you find this information useful and are able to enjoy a more calm morning and enjoy some more sunrises!

    Traffic Flow Simulator

    Overview demo

    This video is a demonstration of simulating traffic flow within and between intersections/local networks using a tcp/ip server and multiple clients. The clients have factories that either create cars or receive them from the server. The client then simulates the traffic flow until the cars arrive at a "sink" or graph exit. The sink may be a normal sink or a network sink. For a normal sink, the vehicles are simply removed from the graph. If it is a network sink the car data is sent on to the server.

    http://www.youtube.com/watch?v=f1qgI55ULIY

    RNS Basics

    Helpers includes a few utility or helper classes. For instance an easy way to get the local machine name and a StopWatch class.

    Demos are examples that demonstrate the basic serial and threaded worlds as well as the distributed clients. The Repeater class in the distributed package has a main() which works as the server.

    The Render package has a text render which is used to output information about the network structure and the location of vehicles on the network.

    http://www.youtube.com/watch?v=1ndETp0ALHA

    RNS Basics Part 2

    In this video I will review, links, connectors, vehicle factories and Cars.

    Links can be thought of as stretches of road. There was some initial code put in place for using coordinates to describe the link geometry. Links are the logical area where you will find cars. Sinks and factories are also special types of links. Sinks destroy cars and factories create them.

    Connectors can be thought of as intersections. They have entry and exit links. Imagine that you are driving in your car approaching an intersection. You are on an entry link to that connector. When you pass through the intersection to a connecting you road, you have driven onto an exit link.

    A Vehicle Factory is used to bring cars onto the local graph.

    Cars carry a globally unique identifier.

    http://www.youtube.com/watch?v=mlTNdqSToTo

    The World

    The World Factory is used to create worlds. It can create serial or threaded worlds. It can be used to create several different road structures.

    http://www.youtube.com/watch?v=jmsyjkdxIVg

    The Server

    The Repeater accepts client connections. It repeats the data from them to all other connected nodes along with the identity of the originating node. If it detects that a node has dropped it removes it from it's client list.

    http://www.youtube.com/watch?v=ktHGs-DpgeA

    Basics of a client node

    A Distributed Client uses the DistributedWorldFactory to create an instance of a DistributedWorld. The DistributedWorld is very similar to the normal distributed world. However, it includes distributed links and the distributed vehicle factory. The world handles the connection with the server. When processing vehicles that are in sinks as part of the update method, outgoing vehicle is sent to the repeater/server if is a distributed link (sink). The world also receives the incoming repeated car data from the repeater. The world passes the data on to all listening factories. The distributed factory determines if it needs the information. If it does, it places it in an incoming queue. Then when the world asks for a shipment from the factory, the factory sends the information about the cars that are in the queue. Even while the world is adding new information to the queue!

    http://www.youtube.com/watch?v=Cc1nYuTujZY

    Network and Node configurations

    Network and Node configuration diagram

    Node A configuration

    This node starts with a normal factory. It is connected to a link which is in turn connected to a network sink. The network sink relays information to the repeater.

    Node B configuration

    This node has a distributed factory which is listening for car data that originates from Node A. It is connected to a link which is in turn connected to a network sink. The network sink relays information to the repeater.

    Node C configuration

    This node has a distributed factory which is listening for car data that originates from Node B. It is connected to a link which is in turn connected to a normal sink. The normal sink simply removes the cars from the local graph.

    Files

    You can get a JAR with the code here http://dbbear.com/TrafficFlowSimulator.jar

    Sample output, which corresponds to the video run can be obtained here:

    Conclusions

    A developer using this code structure will need to be careful to not have multiple distributed factories that pull from the same network sink. If this were to happen we'd have cloned cars in the overall network.

    Association of vehicles with graph objects seems awkward. In a system that is highly focused on traffic a system that uses GIS type concepts would likely be better.

    While this code may not be ideal for true traffic simulation because of the way vehicles are associated with individual graph elements, it does a good job of demonstrating threading and client-server based communication.

    Transforming from serial to threaded

    Background

    As part of an experimenting project I am transforming code that I initially wrote for simulating traffic on a road network into a threaded version.

    Initial Threading

    Initial threading of the removing of cars in sinks (road network exits) yielded a longer run time for the threaded version. Most likely the issue is the limited number of vehicles and only two sinks.

    With this aspect of the project I worked with java.util.concurrent Executors and pooled task execution using maximum/free pool size, a fixed pool size and a pool handled by a single thread.

    Using implements Runnable simulation runs: 5 Simulated run time: 600 seconds

    Serial time: 0.29

    Serial time: 0.222

    Serial time: 0.202

    Serial time: 0.205

    Serial time: 0.2

    Threaded time: 1.866

    Threaded time: 1.275

    Threaded time: 1.202

    Threaded time: 1.273

    Threaded time: 1.122

    Changed up some data structures ConcurrentHashMap and tweaked the code in terms of variable scope. 

    Using fixed thread pool size of 2 Following result:

    Serial time: 0.276

    Serial time: 0.199

    Serial time: 0.16

    Serial time: 0.161

    Serial time: 0.162

    Threaded time: 1.335

    Threaded time: 0.914

    Threaded time: 0.846

    Threaded time: 0.837

    Threaded time: 0.876

    A thread pool size = 2 performs about the same or slightly better than a threadpool size = 1

    A thread pool size of > 2 yields worse results than equal to 2. 

    So overall, this result is somewhat disappointing.  After some discussion with my advising professor I set about profiling the code.

    Setup Profiling

    After some initial research, I decided to give the TPTP project a try.  Primarily since it is part of the overall Eclipse program and installs into the environment.

    TPTP Page

    http://www.eclipse.org/tptp/index.php

    How to install from within Eclipse

    http://wiki.eclipse.org/Install_TPTP_with_Update_Manager

    How to setup your project

    http://www.eclipse.org/tptp/monitoring/documents/tutorials/tptp_btm_setup_4.3.html

     
    After doing the install, I was able to open Eclipse to my project and choose Profile As.  This in turn put me into the profile creator, where I chose to profile the threading.  I was also prompted to switch to the profiling perspective.  Click the checkbox to not be prompted every time to switch perspectives.

    If there is a lot of information for the profiler to process it will consume quite a bit of CPU and leave Eclipse unresponsive while it is processing.  For my project five simulation runs for 60 seconds would leave you with an unresponsive environment and the need to kill the application.  Understand, that since this project is an exercise in threading that there are many threads and pools.  A single 60 second simulation run yields 2400 pools with several threads each.

    Profiling

    The initial thread statistics, blocked time/count and deadlocked time/count show the trouble spots.clip_image001

    Under Monitor statistics, you can drill down further.  Now I have a really good idea of what code needs further inspection.clip_image002

    Switch to Threads Visualizer

    clip_image003

    The blue line corresponds to time in the application.  I had to zoom the time scale to make the trouble area visible.

    Red indicates deadlocked, yellow indicates blocked.  By looking at the call stack we can determine the problem area.

    Run times for this sample: Simulating 60 seconds Threaded time: 0.048 Serial time: 0.0030

    I wanted to try out CyclicBarriers and explicit use of Threads with .start() and .join()  to see if there were any significant differences from the pooled task approach.  The biggest issue for me with both of these approaches is that you need to keep explicit track of either the number of threads or keep a reference to the thread so you can issue the join().  I did notice that the Thread approach seemed to leave Threads running.  Wondering if I needed another join().

    Ultimately I settled on a hybrid of serial code and java.util.concurrent Executors.  Timing numerous runs also indicated that at least for my application Executors where going to be the right approach.  Especially since the type and size of the thread pool is configurable.

    Post Profile

    After copious time spent using the profiler to analyze and adjust the threaded code I now have the following results:

    Serial time: 0.23

    Serial time: 0.143

    Serial time: 0.114

    Serial time: 0.099

    Serial time: 0.11

    Threaded time: 1.383

    Threaded time: 0.889

    Threaded time: 0.843

    Threaded time: 0.831

    Threaded time: 0.785

    Note that the serial times have dropped.  This is a byproduct of a shared base class that was tweaked along the way.  In order to fairly evaluate serial versus threaded code it is important that the serial code be optimized.

    The threaded times are about the same as before.  However, the big difference is that the profiler is now indicating no deadlocks and minimal blocking.  To achieve this I changed some data types and adjusted the thread pools used by each method.  Now three of the five methods are using newCachedThreadPool which creates as many threads as needed/possible.  removeVehiclesInSinks() is now use a newSingleThreadExecutor and I switched to serialUpdateFactories because I was running into blocking/deadlock problems.

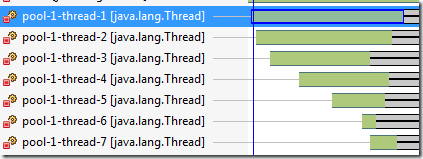
    Nice visual of thread pool execution:

    clip_image001

    Note the lag between the creation of thread pools versus execution times:

    clip_image002

    Busy

    I still wasn’t happy with the serial code being faster than the threaded code.  However, no I knew from looking at the profiled code that threading overhead was significant for the “toy” problem.  So, I thought, what if the methods took longer to run?  In a prior exploration with C# Task parallel computing I had created a “busy” method.  To accomplish the same sort of effect I added in a Thread.sleep(1) to the VehicleLocationCollection::update().  That's a sleep 1ms in an often used method.

    Here's the result:


    Simulation runs: 5 Simulated run time: 60

    Serial time: 4.811

    Serial time: 4.818

    Serial time: 4.818

    Serial time: 4.796

    Serial time: 4.807

    Threaded time: 2.625

    Threaded time: 2.518

    Threaded time: 2.523

    Threaded time: 2.49

    Threaded time: 2.509


    Simulation runs: 5 Simulated run time: 600

    Serial time: 58.564

    Serial time: 59.062

    Serial time: 58.865

    Serial time: 59.021

    Serial time: 59.399

    Threaded time: 30.445

    Threaded time: 30.108

    Threaded time: 30.084

    Threaded time: 31.013

    Threaded time: 37.486

    I'm glad I thought to make one of the more often used methods more intensive.  To me, this shows that there is indeed an improvement over the serial version when the application crosses a threshold of compute intensity/time versus threading overhead.

    Summary

    When comparing serial versus parallel code they should both be optimized.  I started with a working serial implementation and transformed it into a threaded version.  Both versions inherit from a common base class.  Unit tests help verify expected behavior.  When transforming to threaded code I found myself using a top down approach.  Methods which iterate over a collection are an easy target for extracting the interior loop body into a method to run as a task.  Transformation of related data structures to thread safe data types is essential.  Try to minimize or eliminate the need for locking/synchronized code.  Too much locking and you just created threaded code which runs in a sequential manner at best.

    The TPTP project profiling tool is very useful for profiling threaded applications.  You can quickly identify code that is deadlocked, blocked or waiting.  Your efforts can then be focused appropriately.

    Threading is only beneficial once you have enough work to pay the overhead penalty.  Sometimes you are better off using the serial implementation.  ForkJoinTasks take that approach, they fork the problem until it is small enough to process efficiently in a serial way.  The Executors class gives the developer a lot of flexibility in fine tuning the type of thread pool: unlimited, fixed or single.

    Good luck in your threading endeavors!