import json
f = open('exported.json')
for line in f:
    print json.loads(line),
f.close()
Showing posts with label Python. Show all posts
Showing posts with label Python. Show all posts
mongoexport json format UTF-8 characters
So, you just did an export of your mongoDB database into a JSON formatted file called exported.json. In part, you did this because you have this crazy idea of using the JSON with another application. Then you see some strange stuff in the URL fields you exported. Specifically, you see stuff like \u0026 in them. These are actually UTF-8 codes for the % (percent) symbol. If you want to work the exported data back around to the stored format, you’ll want to check out Python’s json library. I’ve included a starting point below.


Strata 2014 Retrospective
Introduction
This year I was fortunate enough to be able to attend the Strata conference put on by O’Reilly and Associates. I started this retrospective by doing a SWOT analysis of my experience. I then expand with some logistics info and take away research ideas.I had high expectations for this conference given its marketing. The last conference of this caliber that I had attended was ÜberConf.
Strengths
- The chairs in the session rooms were comfortable.
- Healthy snack options were available at breaks.
- Sponsored sessions were identified on the agenda.
- There were lots of vendors at the expo.
- Most if not all vendors had technical people on hand.
- Mobile app had maps and schedule.
- They did provide a daily print out of the session schedule and map.
Weaknesses
- The mobile app was more frustrating than useful. It was always wanting to update.
- Being registered in the directory means you’ll start getting spam before the conference even starts.
- Navigating the website to find specific session information was difficult. Easier to find it through Google.
- This is not an inexpensive conference to attend in terms of conference cost, travel and hotel expense.
- Full day workshop
- Late notice on software to pre-install
- Not enough AC outlets
- No tables!
Opportunities
- From key notes, sessions and the vendors you get to learn about what tools/processes the future holds.
- Discern what tools/processes people are using now.
- Talk with other attendees about the work they are doing and the approaches they are taking to it.
- Some insights I had are:
- Many are using Python and Julia for ETL.
- R is being used for analysis.
- Data people are starting to think about discuss data patterns. Such as the Side Kick Pattern presented by Abe Gong (@AbeGong) a Data Scientist from Jawbone.
Threats (or why wouldn’t I want to attend)
- Fundamentals are potentially better learned with targeted training.
- Attending this conference could prevent you from attending another more relevant conference.
- The target audience for this conference is narrow. People that identify with big data, data science and business intelligence are well served by this conference.
Internet
The conference wireless was acceptable for as many people that were using it. Internet in the hotel lobby was very good. There is wired internet available in the hotel room for free. I did not have an opportunity to use it. There is also pay to use wireless available in the room.Research
I came away from the conference with much I want to research and experiment with and people to connect.Tools and Libraries
- scikit-learn.org
- wakari.io web based Python data analysis
- Anaconda Scientific Python development environment
- Getting IPython set up by hand is a pain—Anaconda is a must on Windows machines.
- Pandas Python data analysis library
- Microsoft PowerBI (Office 365)
- D3.js
- The R programming language
- Pentaho, Tableau and other BI tools
- Hadoop
- Aerospike
Techniques
- Adjacency Matrix
- pivot and fold operations
- hexagonal binning
- use visualization for data quality checks
- confusion matrix
- predictive modeling fundamentals
- machine learning
- The work of John Tukey (Statistics)
Speakers
- Abe Gong (@AbeGong) Jawbone Sidekick pattern
- Monica Rogati (@mrogati) Jawbone UP
- Emil Eifrem (@emileifrem) Neo4j
- Wes McKinney (@wesmckinn) Pandas creator
- Joe Hellerstein (@joe_hellerstein)
- Jeffrey Heer (@jeffrey_heer)
Can we make big data management easier? Her 3 research threads are: effective, easier and cost effective.
Summary
I came away with a better appreciation of what constitutes data science, the skills needed, the tools utilized and the vendors in the different areas. If I attend again in the future I would likely skip the workshop day. I would do additional prep working thinking about specific questions I may have for the technical people that the vendors make available.MongoDB M101P Windows 8.1 64bit Installation
This document walks you through installing the tools and libraries needed for the MongoDB M101P course available through university.mongodb.com


Choose the Python 2.7.9 X86-64 installer. Download and install it. Let it go with the default path of C:\Python27
As of this publication date, the course content is not compatible withPython 3.x. So, don’t get it!

Choose System

Choose Advanced System Settings. Then choose Environment Variables button.


Select the System Variables path as shown above. Then click edit. Append this to your system path:
;C:\Python27;C:\Python27\Scripts;C:\mongodb\bin;
Don’t miss the leading and trailing semi-colons.
Download get-pip.py I did this by, right clicking on the link and choosing, save link as
Next, open a cmd prompt. You can do this with <windows> + <r> then typing cmd <enter>
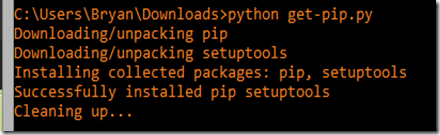
Change to the directory where you downloaded get-pip.py, most likely C:\users\yourName\Downloads, and run it:
python get-pip.py

Download and run the win-amd64 EXE and run it. The current version is pymongo-2.7.2 (pymongo-2.7.2.win-amd64-py2.7.exe). The installer will be blue background with white text and will have a title similar to the following:

After installation, run pip list to see that pymongo is installed (should be the new version).

pip install bottle==0.11.6

I recommend that you create a subfolder for every weeks course files. So, for the first week you would have C:\Projects\m101p\week1
Do not put course files in either the mongodb or python27 installation folders.
Installing MongoDB
Go to www.mongodb.org/downloads
Click on the huge green button to download MongoDB in a MSI file.
(The current version is 3.0.1)
”Unblock” the downloaded MSI by, right clicking on the file and choosing properties. Then hit the unblock button. Then hit Apply, then OK. If you don’t have this that’s okay. Continue on.


Run the downloaded MSI file – you’ll likely have to approve installation
I prefer to choose to do a custom install to C:\mongodb
After you have finished installing, you should now have C:\mongodb
With a subfolder C:\mongodb\bin
Create a folder C:\data
Create a subfolder C:\data\db
Installing Python
Go to the Python download page: www.python.org/download

Choose the Python 2.7.9 X86-64 installer. Download and install it. Let it go with the default path of C:\Python27
As of this publication date, the course content is not compatible with
Setting your path
If you want to be able to easily run the Python and MongoDB binaries from the command line you need to set your system path.
Choose System

Choose Advanced System Settings. Then choose Environment Variables button.


Select the System Variables path as shown above. Then click edit. Append this to your system path:
;C:\Python27;C:\Python27\Scripts;C:\mongodb\bin;
Don’t miss the leading and trailing semi-colons.
Installing PIP
Go to http://www.pip-installer.org/en/latest/installing.htmlDownload get-pip.py I did this by, right clicking on the link and choosing, save link as
Next, open a cmd prompt. You can do this with <windows> + <r> then typing cmd <enter>
Change to the directory where you downloaded get-pip.py, most likely C:\users\yourName\Downloads, and run it:
python get-pip.py

Installing pymongo
Visit https://pypi.python.org/pypi/pymongo/#downloads
Download and run the win-amd64 EXE and run it. The current version is pymongo-2.7.2 (pymongo-2.7.2.win-amd64-py2.7.exe). The installer will be blue background with white text and will have a title similar to the following:

After installation, run pip list to see that pymongo is installed (should be the new version).

Installing bottle
Use pip to install bottle. Note that we have to use a special option to specify the version of bottle that we want installed.pip install bottle==0.11.6

Project folder
Create yourself a project folder such as C:\Projects\m101pI recommend that you create a subfolder for every weeks course files. So, for the first week you would have C:\Projects\m101p\week1
Do not put course files in either the mongodb or python27 installation folders.
Starting MongoDB
I also suggest that you see this gist: https://gist.github.com/k0emt/10342867 as a way to start up a development mongod instance.
Stopping MongoDB
Use the mongo shell to properly shutdown mongod. Issue the following commands:
use admin
db.serverShutdown()

Subsequent to issuing the commands you will see some error messages. This is normal as the shell just lost connection with the server. You can now use <ctrl> + <d> or type the word exit to quit the shell.
MongoDB Schema
One of the major aspects of MongoDB is that it is a document store. You can put anything you want into a document-- it is schema-less. However, in many cases the documents stored in a collection do consist of the same fields. So, in answer to the question, "how do I determine the schema of a collection?" There are a couple options.
- Manually/visually inspect the contents of the collection
- Use a utility to examine a single document
- Use some sort of utility to examine all of the documents in a collection
Manually inspecting the collection
As you can imagine is simply, "using" the database, and doing a db.collectionName.findOne()
For thoroughness, you'd probably want to examine more than one document. This is where a db.collectionName.find().pretty() will come in handy.
Use a utility to examine a single document
I created a small python utility given a database name and collection name will give you the keys for a document in the collection. This requires you have Python 2.7 and pymongo installed on your computer. I put this in my ~/bin directory and chmod +x it.
Use a utility to examine all of the documents in a collection
Skratch. has a cool extension to the MongoShell which examines all of the documents in a collection and tells you how many documents are using the field. Fields can vary in type by document. So, this tool even breaks down the occurrence of the field by type! It is on github at: https://github.com/skratchdot/mongodb-schema/
MongoDB examples, Replica Set and GridFS
MongoDB Replica Set with Python example
I published a short lab on working with MongoDB replica sets in Python on GitHub https://github.com/k0emt/mongodb_repset_experimentOne thing to note is that I included all of the replica set nodes in the connection information. That is because if "regular" primary node was down at the time of initial connection the code would fail.
The nodes in the replica set will figure out who should be primary and that will happen auto-magically behind the scenes. However, your client code still needs to deal with needing to reconnect.
Adjust the counters if you want to have the client up and running longer while you experiment.
MongoDB GridFS with Java example
Example code for demonstrating GridFS and the metadata field with Java was also published on GitHub https://github.com/k0emt/gridfs_example_javaBy utilizing the metadata field you can keep your document metadata with it.
Where have I been? (MSE ITS Project)
I wasn’t as prolific with my posts in 2011 and this year because I was focusing on finishing my Master Software Engineering degree and Intelligent Transportation System (ITS) project. My project website with full documentation and source can be found here: http://people.cis.ksu.edu/~bnehl/
My MSE project takes a Multiagent System approach to the Control of Traffic Signals (MACTS). In additional to control of the local intersection there will be a configuration which incorporates near neighbor coordination. The system was designed with the intent of utilizing distributed cooperating agents. The system goals include minimizing the number of stops, reducing the amount of wait time, reducing travel time, increasing the average speed of travel, reducing fuel consumption and reducing the production of hydrocarbon emissions.
The project code interfaces with the Simulation for Urban MObility (SUMO) application. MACTS was implemented with Python, RabbitMQ and MongoDB.
Python Coding Standard, Metrics and Test Coverage
Motivation
My motivation in seeking a coding standard, static code metrics analyzer and test coverage tool is multifaceted. I want to know that my Python code is formatted in a way that is accepted by the community. I want to be able to quickly check the cyclomatic complexity of code. It is my intent to test drive my code. Therefore, I wanted a tool which could show me and others the level of code coverage and any areas that need to be brought under test.
Note that the preferred download for all three of these tools is a .tar.gz format file. On a Windows system you’ll need a tool like 7-zip. All of this guidance is intended for use with Python 2.7 and PyCharm 1.5.4. You need to add C:\Python27\ to your PATH environment variable in order to successfully install these tools.
PEP8
PEP8 is a tool that provides guidance that you are following proper Python coding formatting. Download from here: http://pypi.python.org/pypi/pep8
Extract the PEP8 folder. Using a command prompt change to the extracted PEP8 folder directory. Run: python setup.py install There should now be a pep8.exe and pep8-script.py in your python installations scripts directory. You can now delete the extracted PEP8 folder.
PEP8 with PyCharm
From http://www.in-nomine.org/2010/12/14/pycharm-and-external-lint-tools/
PyCharm already has a number of features present in various tools to lint/check your source code with, but offers a way to hook up external tools. Under File > Settings is a section called IDE Settings. One of the headings here is called External Tools. Select this heading and then press the Add... button on the right hand pane to configure a new external tool.
In the Edit Tool window that now appeared fill in a name, e.g. PEP8 and a group name Lint and add a description. Next point the Program to the location of the pep8.exe executable, e.g. C:\Python27\Scripts\pep8.exe. ForParameters you need to use $FilePath$ and Working directory should be same as the Python scripts directory. Once done, you can close it by pressing the OK button.
Now add a filter to the external tool to get click-and-go-to behavior

See http://www.jetbrains.com/pycharm/webhelp/add-filter-dialog.html for how to add filters.
use this for the spec: $FILE_PATH$:$LINE$:$COLUMN$:.*

Select a file either in the navigator or editor panes.
Then from menu can go to Tools > Lint > PEP8
You'll also have links you can click on for the PEP8 output.
Following my initial installation notes on a second machine I was getting a urllib.parse error from PEP8.exe, "no module named parse" Seemed like this problem is related to distribute. Pulled down the latest from http://pypi.python.org/pypi/distribute Nope, wouldn't install. Looking like issue with C:\python27\lib\urllib2.py. Web pointed me to reinstall setuptools http://pypi.python.org/pypi/setuptools Installed that… tried to install distribute again… still no go… X| Ended up doing a python setup.py install to get distribute installed. Now, PEP8 works!
PyMetrics
PyMetrics is a tool for doing static code analysis. Download it here: https://github.com/ipmb/PyMetrics/downloads There is a tar.gz on SourceForge. However, the pymetrics runner does not have the .py extension which causes problems with extraction on a Windows System.
Extract your downloaded file. Change to that directory and run python setup.py install You can now delete the extracted folder. Now if you look in your Python scripts directory you'll find a pymetrics.py
Set up as an external tool in PyCharm as with PEP8.

The --nosql and --nocsv options tell the tool to not generate associated SQL insert code and suppresses the generation of a related CSV file.
Sample output from DarkMatterLogger.py
An earlier version of the DarkMatterLogger.py that was analyzed can be found here: https://gist.github.com/1218497
C:\Python27\python.exe C:\Python27\Scripts\pymetrics C:\macts\source\spikes\DarkMatterLogger.py
=== File: C:\macts\source\spikes\DarkMatterLogger.py ===
Module C:\macts\source\spikes\DarkMatterLogger.py is missing a module doc string. Detected at line 1
Basic Metrics for module C:\macts\source\spikes\DarkMatterLogger.py
-------------------------------------------------------------- 4 maxBlockDepth
12 numBlocks
3726 numCharacters
2 numClasses
15 numComments
5 numFunctions
24 numKeywords
104 numLines
668 numTokens
14.42 %Comments
Functions DocString present(+) or missing(-)
--------------------------------------------- DarkMatterLogger.__init__
- DarkMatterLogger.sendMessage
- DarkMatterViewer.__init__
- DarkMatterViewer.__init__.msg_consumer
- main
Classes DocString present(+) or missing(-)
------------------------------------------
- DarkMatterLogger
- DarkMatterViewer
McCabe Complexity Metric for file C:\macts\source\spikes\DarkMatterLogger.py
-------------------------------------------------------------- 1 DarkMatterLogger.__init__
1 DarkMatterLogger.sendMessage
1 DarkMatterViewer.__init__
2 DarkMatterViewer.__init__.msg_consumer
1 __main__
4 main
COCOMO 2's SLOC Metric for C:\macts\source\spikes\DarkMatterLogger.py
-------------------------------------------------------------- 55 C:\macts\source\spikes\DarkMatterLogger.py
*** Processed 1 module in run ***
Process finished with exit code 0
Coverage.py
Coverage.py is a tool for doing code coverage analysis. Download it here: http://pypi.python.org/pypi/coverage If you have a 64bit installation you’ll want to make sure you use the .tar.gz and not succumb to using a prepackaged exe.
Downloaded the coverage-3.5.1.tar.gz version. Extract folder from gzipped tar file. Chang to directory of download and: python setup.py install Now if look in c:\python27\lib\site-packages will see coverage-3.5.1-py2.7.egg Look in the scripts dir and a coverage.exe and coverage-script.py will be seen.
Gather metrics on your code with: coverage run class.py
Then get the report with: coverage report -m
The -m says show the line #s of statements that were not executed. Use coverage erase to get rid of previously run data. During my experimenting every run would get rid of previous data.
Set up as an external tool in PyCharm like other tools. Except had to do one for the run and another for the report. Others are integrating into their environment using nose.
Name: Coverage
For program: C:\Python27\Scripts\coverage.exe
For parameters: run $FileName$
Working directory: $FileDir$
Name: Coverage Report
For program: C:\Python27\Scripts\coverage.exe
For parameters: report -m
Working directory: $FileDir$
Coverage Sample Output
C:\Python27\Scripts\coverage.exe run C:\macts\source\spikes\ArgumentsTests.py
...........
----------------------------------------------------------------------
Ran 11 tests in 0.004s
OK
Process finished with exit code 0
Coverage Report Sample Output
C:\Python27\Scripts\coverage.exe report -m
Name Stmts Miss Cover Missing
----------------------------------------------
arguments 33 0 100%
argumentstests 45 0 100%
----------------------------------------------
TOTAL 78 0 100%
Process finished with exit code 0
Summary
By integrating these three tools into your development process you’ll increase the community acceptance of the code you produce as well as increase the quality of the code you produce.
Getting the Enron mail database into MongoDB
Background
In order to get some experience working with Python and MongoDB I decided I would like to find a data source with a lot of free form text. This would give me experience in pulling the data into MongoDB and at a future date I’ll have a ready data source for use with learning NLTK.Finding a large dataset that met my needs turned out to be harder than expected. I came across Hilary Mason’s link page of research-quality data sets (now a dead link, see my collection which includes as much of Hilary's as we could recover.) and found the Enron email dataset. This data set contains over 500K emails. The emails are in individual files stored in a directory structure. To me, the first step in being able to use the data is to get it into a database where I could query it.
The environment
The code was developed on an Intel Core-I7 machine with 6G of RAM and a 5400RPM hard disk. This code is I/O intensive and could have benefitted from a faster hard disk or an SSD. The host OS was Ubuntu 11.04 64bit. The tools used were Python 2.7 with pymongo and MongoDB.The code
How to query
You can use the mongo shell to do some queries once you have loaded the data.“use the enron_mail” database and you can do the following:
db.messages.find({ contents : /query text/i }).limit(1).skip(0);
Besides content, the document structure also includes: mailbox, subFolder and filename.
Here are some additional links with material on the shell and how to query:
http://www.mongodb.org/display/DOCS/Overview+-+The+MongoDB+Interactive+Shell http://www.mongodb.org/display/DOCS/Tutorial http://www.mongodb.org/display/DOCS/Querying http://www.mongodb.org/display/DOCS/Advanced+Queries
Analysis
Important things to note about the code:Here are some references on unicode:
http://docs.python.org/howto/unicode.html http://stackoverflow.com/questions/4685568/importing-file-with-unknown-encoding-from-python-into-mongodb
The full run took ~21 minutes after an initial run that probably had a bunch of files in cache. The run maxed out a single core of the CPU. The process was i/o bound with the hard drive. The full 6G of RAM was in use on the machine
My query of MonogoDB says I have 517,424 emails in the document store. It shouldn’t be too difficult to modify the code to work with your database of choice.
I hope you find this code useful and that it enables you to do some analysis with this dataset.
Addendum
Brendan McAdams @rit created a version of the code which utilizes the Python email library to produce a database with more metadata. You can see the results of his work here: http://mongodb-enron-email.s3-website-us-east-1.amazonaws.com/ (now a dead link)
Subscribe to:
Posts (Atom)